How to Install an O2 Sensor Spacer in Texas-Spec Vehicles (Step-by-Step Guide)
Summary
Installing an O2 sensor spacer can help reduce the likelihood of triggering a check engine light (CEL) due to a high-flow or removed catalytic converter. This guide walks you through a safe, emissions-aware installation process that considers the specific requirements of Texas-spec vehicles—especially those subject to emissions testing in counties like Harris (Houston), Travis (Austin), Dallas, and Bexar (San Antonio).
Table of Contents
-
What You Need to Know Before Installing
-
Tools & Parts Required
-
Step-by-Step Installation Guide
-
Vehicle-Specific Tips (Toyota, Ford, Chevy)
-
Post-Installation Checklist
-
Legal Considerations in Texas
-
FAQs
1. What You Need to Know Before Installing
-
Spacer Use Case: Designed for downstream (post-cat) O2 sensors to prevent false P0420/P0430 codes.
-
Inspection Impact: In Texas emissions counties, improper use may still cause inspection failure.
-
Sensor Location: Always verify sensor location using your vehicle’s service manual or scan tool.
-
Warning: Do not use spacers on upstream O2 sensors—this can alter air-fuel ratios and damage the engine.
2. Tools & Parts Required
-
Oxygen sensor socket or 22mm wrench
-
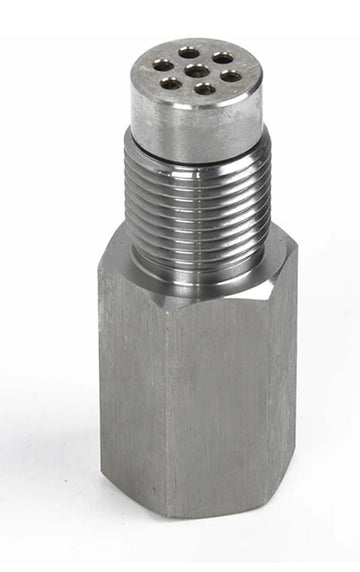
O2 sensor spacer (straight, angled, or mini-cat style)
-
Anti-seize compound
-
Jack and jack stands or a vehicle lift
-
OBD2 scanner (optional but recommended)
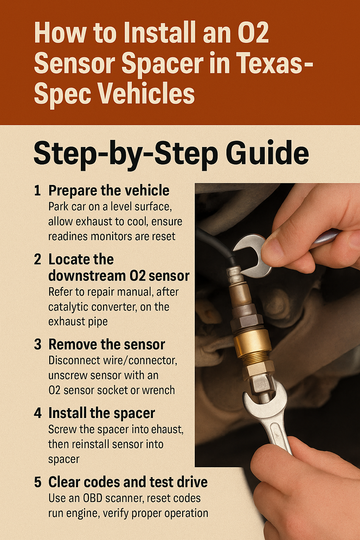
3. Step-by-Step Installation Guide
Step 1: Safety First
Park your vehicle on level ground. Use a jack and secure jack stands to access the exhaust area.
Step 2: Locate the Downstream O2 Sensor
Identify the post-cat sensor, usually after the catalytic converter in the exhaust pipe.
Step 3: Remove the Sensor
Use an oxygen sensor socket or 22mm wrench to carefully unscrew the sensor.
Step 4: Apply Anti-Seize
Lightly coat the threads of the spacer and O2 sensor with anti-seize compound for future removal.
Step 5: Install the Spacer
Thread the spacer into the O2 bung on the exhaust pipe. Hand-tighten, then snug with a wrench.
Step 6: Reinstall the O2 Sensor
Thread the sensor into the spacer. Make sure wiring is not twisted or pinched.
Step 7: Clear Codes and Check Readiness
Use an OBD2 scanner to reset any CELs and confirm readiness monitors. Drive the car through a standard drive cycle.
4. Vehicle-Specific Tips (Toyota, Ford, Chevy)
Toyota: Many models have easily accessible O2 bungs but limited clearance. Use a 90-degree spacer for best fit.
Ford: Some Ford trucks (F-150, Explorer) require a mini-cat spacer for effectiveness.
Chevy: Camaro and Silverado owners with high-flow cats may benefit from angled or adjustable spacers.
5. Post-Installation Checklist
-
CEL is off
-
No exhaust leaks
-
Readiness monitors set to "complete"
-
Wiring is secure and clear of heat sources
6. Legal Considerations in Texas
-
It is illegal in Texas to tamper with emissions controls.
-
O2 sensor spacers are not a legal substitute for a functioning catalytic converter.
-
In emissions-required counties, your vehicle must pass an OBD readiness test.
-
Using spacers may be considered a "defeat device" under federal EPA rules.
Disclaimer: This guide is for educational purposes only. Ghaly Motor Parts does not condone illegal modification of emissions systems.
7. FAQs
Q: Will this help me pass Texas emissions inspection?
A: Possibly, if the readiness monitors set and no CEL is triggered. However, it's not guaranteed and may be illegal.
Q: What type of spacer works best?
A: It depends on your vehicle's layout. Mini-cat or 90-degree spacers often provide better results.
Q: Can I use it on the upstream sensor?
A: No. Only use on downstream sensors to avoid driveability issues.
Q: Is this a permanent fix?
A: No. It may help temporarily suppress a CEL but doesn't replace a working catalytic converter.
Need help choosing the right spacer for your car? Browse our O2 sensor spacer selection here or contact our tech support team for guidance.
![ Fix P0420 Fast: Do O2 Sensor Spacers Really Work? [Legal Tips Inside]](http://ghalysmotorparts.com/cdn/shop/articles/ChatGPT_Image_Oct_10_2025_10_40_32_AM.png?v=1760118069&width=360)
![Do O2 Sensor Spacers Really Help Clear the P0420 Code? [Expert Guide]](http://ghalysmotorparts.com/cdn/shop/articles/ChatGPT_Image_Oct_9_2025_09_28_33_PM_654c1798-c0d4-428f-a5b6-f20b95661b54.png?v=1760129952&width=360)